
Today I am sharing what is my current favorite card that I’ve made to date: the “one in a chameleon” card, with a chameleon that changes color!

This card took more work than anything I’ve made before but I think it was so, so worth the effort! Because of the reveal wheel and the double layer of paper it takes to make it work, the card has a nice, hefty feel to it, and the bright colors are just so fun and happy. And of course the interactive element to spinning the wheel really puts it over the top!
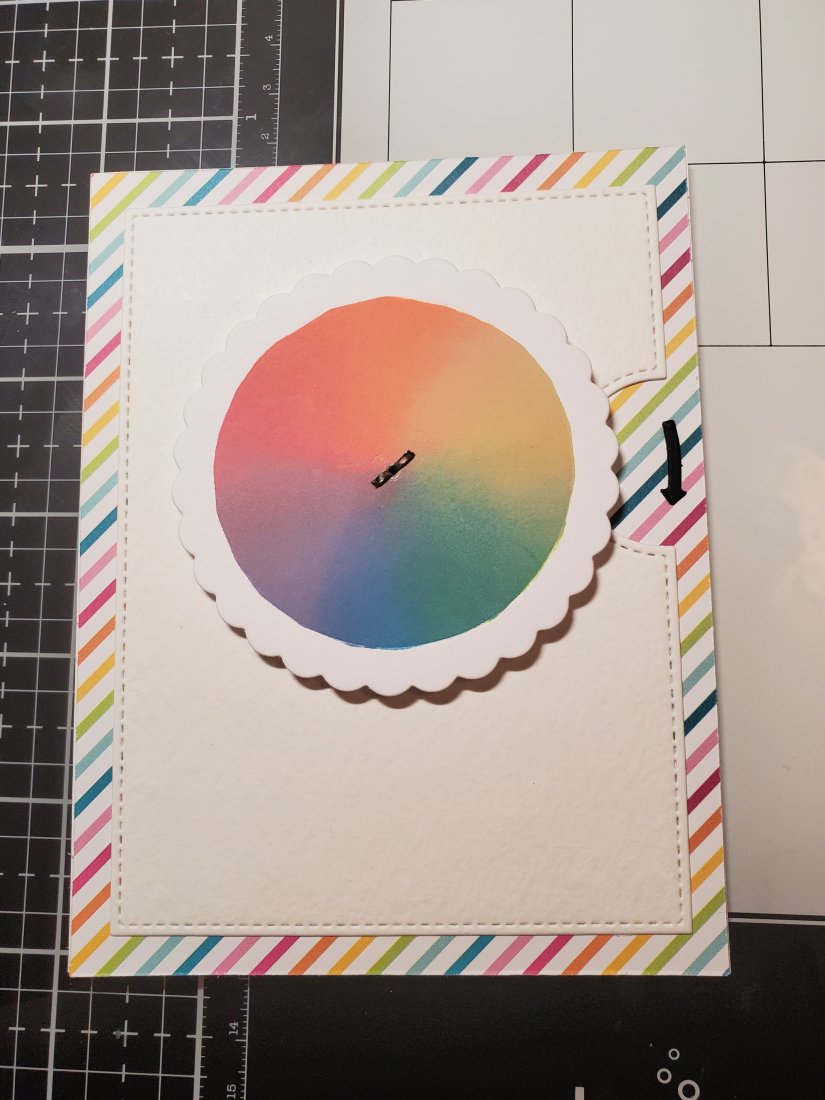
I started this card by blending some Tumbled Glass ink on watercolor paper, then die cutting it with the Stitched Clouds Backdrop. I then die cut that same piece again with the reveal wheel die, but only the border/outline die piece. When I ran it through my die cut machine I didn’t include the puzzle piece that has the reveal window, because I wanted the shape of the chameleon to be the “window.” More on that later…
I die cut the rest of the reveal wheel pieces, including another border/outline piece for the backing from watercolor paper, the wheel and wheel backing piece from white cardstock, and the little arrow from Black Licorice cardstock.
I set everything aside except for the wheel. I knew that I wanted the chameleon colors to be kind of a surprise when someone was spinning the wheel, so I wanted to make sure the little scalloped edge on the wheel remained white. That way, the colors would only show through where the chameleon was, and not on the “spinner” part where your finger goes. There is probably an easier way to do this, but I just masked off the entire outer edge of the wheel with purple tape. There is a score line that goes around the edge of the circle and it served as the perfect guide for where to place the tape so that the entire middle could remain uncovered.
Next I had the fun of blending all the colors for the chameleon. The distress oxide ink colors I used were Barn Door, Ripe Persimmon, Mustard Seed, Mowed Lawn, Salty Ocean, and Dusty Concord. It was a pretty small space for 6 different colors so I just tried to make sure I used about the same amount of each color and overlapped them slightly. I then removed the tape from all around the edge and set the wheel aside to dry.
The “window” part of this card took a little more work than it normally would, since the chameleon stamp set was not made to automatically be paired with the reveal wheel. I took my blue ink blended paper that would be the front of my card and laid the outline/border die on top of it, lining up the edges right with where it was already cut. I then took the reveal window puzzle piece die and laid it in place right where it fits in the border die, as if I was preparing to use it to cut. This showed me right where the window should fall on the card to make the wheel work with it. I took the die cut for the chameleon, placed it over the window die, got it lined up right where it should go, and then did a little switcheroo. I pulled the window puzzle piece die out from underneath and taped the chameleon die right in its place. I removed everything else and ran it through my die cut machine, giving me a perfect chameleon-shaped window on the front of my card.
Once I had that ready, I assembled my wheel. I put a mini brad through the wheel backing piece and then through the wheel itself, and folded the stems down. After holding the wheel up to my chameleon window for a test, I realized that the stems of the brad would be visible through the chameleon, which I of course did not want. This only happened because the chameleon shape is a larger open space than the actual reveal wheel window, so you see more of the wheel than you normally would. I used tin snips (the same ones I use to cut dies apart) and just trimmed down the stems a little, and that made them small enough to stay out of sight.
To attach the wheel to my card, I turned it over and put square pieces of foam tape on the wheel backing piece all around the brad (but not touching it, so that it would still be able to spin.) I removed the backing from the foam tape so that I would be ready to adhere it right when it was in place. I then took the front card piece with the chameleon-shaped window and held the wheel behind it, facing up so I could see the colors through the window. I moved the wheel around until I had it in just the right spot, where the colors would show through the chameleon window but would not be visible by the spinner. Once I had it right where I wanted it, I laid both pieces down on the plain backing piece and pressed it down (the outline/border piece with no window shape cut out of it), making sure the top and bottom pieces were lined up exactly. Since only the wheel had tape on it, I took the top piece off to continue working on it, and that left me with the wheel perfectly placed and adhered to the backing piece.
I cut a piece of striped rainbow paper from the Sweet Celebrations paper pack from My Favorite Things and adhered it to my A2 card base. I then adhered the backing piece and wheel to that base using my Scotch Advanced Tape Glider, and glued the arrow on with liquid glue. Here you can see my ink blended wheel in all its glory. ☺️
The next thing I did was make my chameleon. I cut a small square of clear acetate and stamped the chameleon in black Stazon ink – a very important material! (I first tried to use black Versamark ink but even after using a heat tool on it and letting it sit overnight, the ink smeared. Lesson learned!) I then placed the acetate behind the window cutout, lined it up, and taped it down. I added a googly eye from my stash as a finishing touch.
To finish decorating the front of the card I cut a piece of Noble Fir cardstock with a Grassy Border and attached it to the bottom edge. The tree branch that came with the chameleon set was a little too short for my card, so I die cut the branch from the Winter Sparrows stamp set in Ground Coffee cardstock and used that instead. The size and shape was perfect! I stamped the leaves from the chameleon set in Crushed Olive ink, die cut them, and placed them around the branch. I then placed foam tape all over the back of the top piece and attached it to the backing piece and card base. I had to use skinny foam tape in some places so it wouldn’t interfere with the wheel, but I think the more tape, the better, so the card doesn’t have any spots that feel hollow.

The final step was to add the sentiment. The top part was stamped with black Versamark ink using my MISTI. For the “chameleon” word, I cut a Simple Wavy Banner out of white cardstock and stamped it in black Versamark ink as well. I then went over it with an embossing pen and embossed it with clear sparkle embossing powder. I attached the banner to the card with foam tape, and the card was complete!
(I had a short video showing how the card looked in action but had to delete it!)
I really love the way this card turned out and I can’t wait to give it away! I already have plans to make it for at least one more upcoming birthday. I hope the recipients enjoy it as much as I do!

1 thought on “One in a Chameleon”