
Last month I reached the milestone of creating my 1,000th card. It took 5 years and 5 months and I was excited to reach that big number.
This was a recreation of a design by Mimi that I had really liked and I ended up making 2 identical cards. I actually started making this design and struggled for days figuring out the placement and order of things, and I got to a point where it wasn’t working and didn’t look good and I had to start the entire thing over almost completely from scratch. I was so frustrated but then once I started over I was able to complete the whole thing in 3 hours because I had learned what I needed to do. Still, it was an annoying process and I was glad to be done with it.
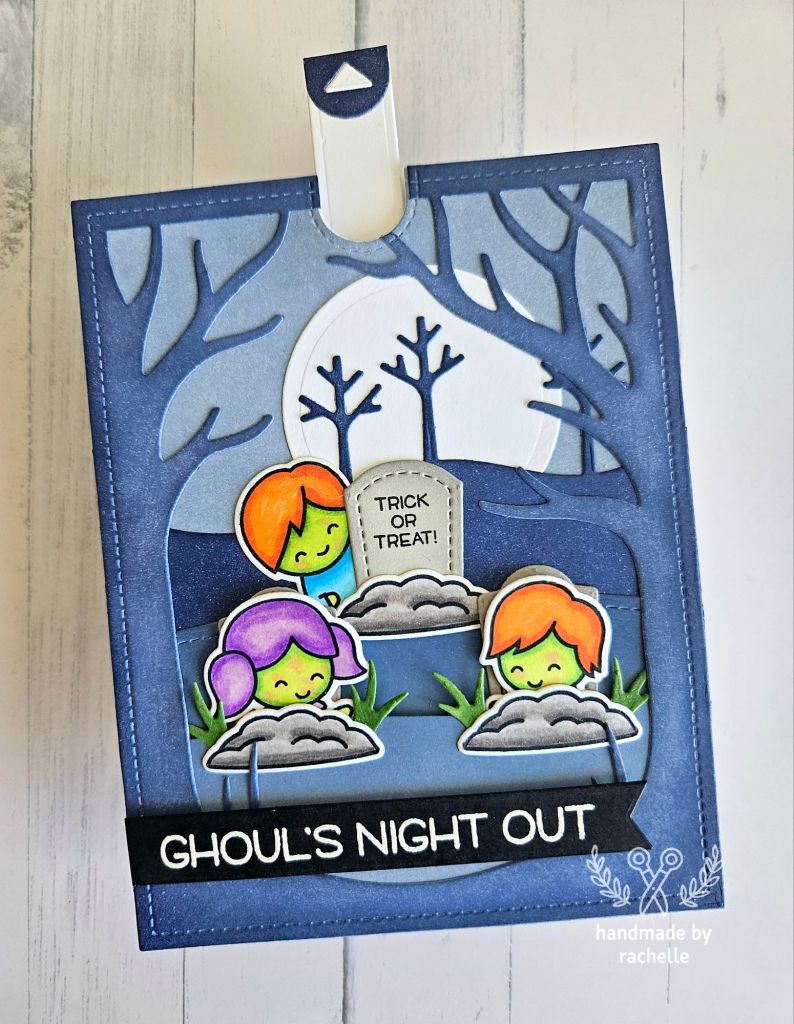
It was only a few days later that I was ready to make my 1,000th card and I ended up deciding to remake this design, of all things. I knew it would be easier since I had worked out all the steps and I love Halloween and the fun of this design, so it seemed fitting for it to be card # 1,000. It ended up taking 5 hours to make, which was a little surprising, but I love the final result.


This card requires 6 different layers:
- The background sky layer
- The background stitched tree layer
- The hillside with the top gravestone
- The hillside with the bottom 2 gravestones
- The frame with the spooky trees
- The hidden layer with the pull tab mechanism
First I cut out a rectangle for the sky background and ink blended it with Stormy Sky. I took the notch piece from the Let’s Toast Pull Tab set and cut a notch in the top of the sky piece. It’s important to do this before attaching anything together so that you don’t run things through the die cut machine when they’re already glued and end up smooshing things down and having bottom layers show their lines through. (I may have done this on the version that got scrapped.)
Next I cut another rectangle and then cut it with the Stitched Tree Border so that the tree border was about 3 1/4 inches high. I ink blended that layer with Chipped Sapphire.
I cut the 4th from the smallest of the Circle Stackables for the moon. I attached the moon to the sky layer and attached the stitched tree border on top of that.
I then cut another rectangle and then cut it with a Simple Stitched Hillside Border. That hillside was right between 2 1/4 and 2 1/2 inches high. I ink blended that piece with Faded Jeans.
I cut 3 gravestones from the Spooky Forest Backdrop out of Fog cardstock. I ink blended the sides with Hickory Smoke to give them some dimension. I stamped sayings on each gravestone from different sets: “Trick or Treat” and “Eek” are from Spooky Village and “Boo” is from Tiny Halloween.
I stamped 3 dirt mounds from A Bug Deal and colored them with W1, W3, and W5.
I stamped the boy from Screen Time and both children from Joy To All. I colored their faces with YG00, YG01, YG07, and R20. The orange hair was colored with YR04, YR09, and YR14. The purple hair was colored with V000, V01, and V04. The blue shirt was colored with B00, B02, and B04. The green shirt was colored with YG07 and YG17. The girl’s dress was colored with V000 and V01 (even though you really can’t see the clothing of the bottom two.)
I attached one of the dirt mounds and a gravestone to the Simple Stitched Hillside Border and attached the boy from Screen Time behind them. I had to trim off part of the bottom of the boy to make sure he stayed hidden behind the gravestone and dirt. Once they were secured together I attached that whole piece to the background with the sky and the stitched trees.
I then cut another rectangle and for this layer I just used my scissors to cut a subtle wavy line horizontally across it about 1 1/2 inches high. I ink blended this layer with Faded Jeans at the top and Stormy Sky towards the bottom. I cut a few grass clumps from the Spooky Forest Backdrop and colored them with a green copic marker. I then attached the grass clumps and the remaining 2 dirt mounds to this layer, spaced out where I wanted the 2 kids to pop up. I set this layer aside.
I then cut another rectangle and used the Let’s Toast Pull Tab to cut a notch in the top again. I cut out the other pieces of the pull tab mechanism and assembled them. I used the slot piece to cut out a slot and extended it a little further with an Xacto knife. For the actual pull tab piece I had to cut 2 pieces and attach them together because of how long a distance it needed to travel on the card. I used tape to smooth over the parts where they connected so that they wouldn’t catch on anything when the pull tab was in motion. I also cut out a piece of sturdy cardstock with the biggest straight piece in the Slide On Over set and attached that to the bottom of the pull tab mechanism. This piece spans across the bottom of the card so that both of the children can be attached to it and the pull tab can pull them both up at once.
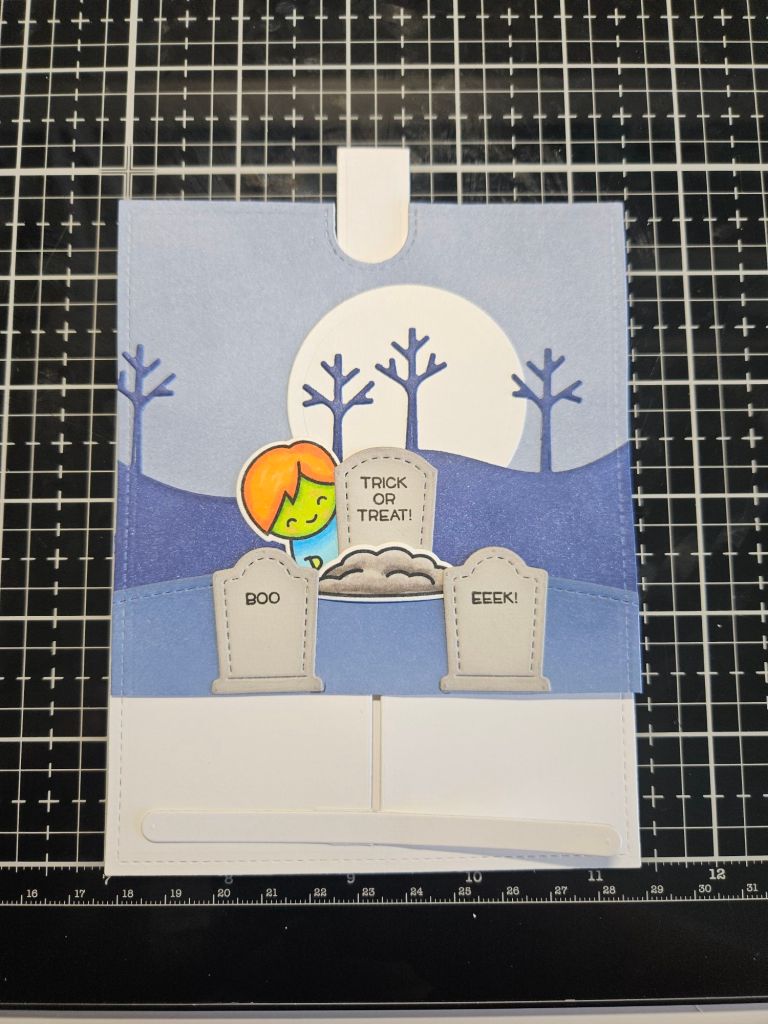
This is where assembling the card can get a little tricky. I laid the front piece down (with the grass clumps) over the background sky piece. After measuring how much of the background that front piece would cover, I cut off the bottom of the background sky piece as high as possible while keeping the cut hidden. I then attached the remaining 2 gravestones to the background sky piece so that they were in line with the dirt mounds on the front piece.
So at this point there are 3 sections to the card: the layer with the pull tab mechanism, the background sky layer, and the front piece with the grass clumps. Cutting off the bottom of the background sky piece opens up the bottom area of the card so that when the pull tab mechanism is behind it, it can move up and down freely. I attached the 2 children to the Slide On Over piece and made sure the mechanism worked, so that the children would start out low enough to be hidden and would end up high enough to be visible when the pull tab was pulled.


I then attached the pull tab mechanism piece to the background sky piece. I attached them both to a card base with some foam tape to give the mechanism space to move. Then I attached the front piece with the grass clumps to the other pieces, putting adhesive only on the bottom and sides to create kind of a pocket so that the mechanism could move freely behind it.
I then cut out the Spooky Forest Backdrop and ink blended it with Chipped Sapphire and Faded Jeans. I cut a notch in this piece as well with the Let’s Toast Pull Tab set. I attached this to the front of everything.
The final step was to add the sentiment from Booyah and the card was done! So much time and effort but I’m happy with how it turned out.
Materials used:
- Large Stitched Rectangles
- Distress oxide inks: Stormy Sky, Chipped Sapphire, Faded Jeans, Hickory Smoke
- Stitched Tree Border
- Circle Stackables
- Let’s Toast Pull Tab
- Simple Stitched Hillside Borders
- Spooky Forest Backdrop
- Fog cardstock
- Spooky Village
- Tiny Halloween
- A Bug Deal
- Screen Time
- Joy To All
- Slide On Over
- Booyah
- White embossing powder
- Black Licorice cardstock
- Everyday Sentiment Banners
